
by Abdullah Faraz
April 3, 2025

Reviewed by Ford
Truck Dispatch Specialist
In this post, I’m going to show you how to reset the carrier reefer unit.
In fact, this simple reset process can help you solve many problems.
Additionally, we’ll discuss the basic usage of carrier reefer unit with images for easy understanding and common errors.
Resetting Carrier Reefer Unit
Understanding the Reset Button Locations
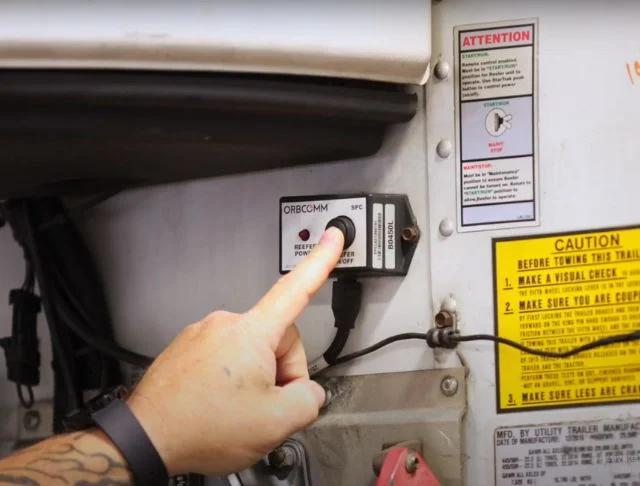
Different reefer manufacturing companies have different methods of resetting the carrier unit. But all have one of two main places for the reset button:
- Separately installed button for power on/off near the unit, but it is outside the unit box and mostly underneath.
- The button is installed within the carrier reefer unit near other buttons, as seen in image two.
Resetting
Once you find the reset button, simply turn the power off and leave it for 1 to 2 minutes and then turn the power on.
This will reset the carrier reefer unit.
Expert Advice
If you are struggling to find reefer loads or your weekly gross has stopped growing at some point, feel free to check out reefer truck dispatch service and get high rates per mile paying loads.
Additional Carrier Reefer Functions Explained
1. Start/Stop – Continuous Mode Button
- Start/Stop Mode (Economy Mode)
- The unit cycles on and off automatically based on the temperature setpoint.
- Saves fuel by running only when cooling is needed.
- The unit cycles on and off automatically based on the temperature setpoint.
- Continuous Mode
- The reefer runs continuously, maintaining a steady airflow and temperature.
- Used for sensitive loads like fresh produce or pharmaceuticals.
- The reefer runs continuously, maintaining a steady airflow and temperature.
2. Defrost Button
- Manually initiates a defrost cycle to remove ice buildup from the evaporator coil.
- The reefer also has an automatic defrost mode, but you can use this button if needed.
- Recommended if frost is affecting cooling efficiency.
3. Menu Button
- Accesses the reefer’s main menu for settings and diagnostics.
- Typically allows navigation through:
- Alarm codes (checking active errors)
- Setpoints & temperature settings
- Battery voltage & unit diagnostics
- Manual overrides and advanced settings
- Alarm codes (checking active errors)
4. Temperature Control & Navigational Buttons
- Arrow Buttons (Up/Down/Left/Right) → Navigate through menu options.
- Enter Button → Confirms selections in the menu.
- Temperature Increase/Decrease Buttons → Adjusts the setpoint temperature.
5. Below Row of Buttons (Varies by Model)
These buttons may include:
- Manual Pre-trip: Runs a diagnostic check to ensure the reefer is functioning properly.
- Manual Override: Forces the reefer to run even if an alarm code is present.
- Standby Mode: Switches the reefer to electric power if available.
- Navigation & Selection: After opening the menu, you can navigate using them or make a selection.
How to Troubleshoot Carrier Reefer Issues
Troubleshooting a Carrier reefer unit involves identifying and addressing issues that may arise during operation. Here’s a comprehensive guide to help you diagnose and potentially fix common problems:
Common Reefer Problems and DIY Fixes

1. Temperature Control Issues
- Symptoms: Temperature not reaching set point, or fluctuating.
- Causes: Incorrect set point, faulty temperature sensor, or refrigerant leaks.
- Solutions:
- Verify the set point is correctly set.
- Inspect the temperature sensor for damage or incorrect placement.
- Check for refrigerant leaks using a leak detector.
2. Alarm Codes
- Symptoms: The display shows error codes
- Causes: Specific faults like sensor failures or wiring issues.
- Solutions:
- Refer to the user manual for specific code meanings.
- Address the issue based on the code (e.g., sensor or wiring problems).
3. Compressor Not Running
- Symptoms: Compressor does not start or run continuously.
- Causes: Low refrigerant, faulty compressor, or electrical issues.
- Solutions:
- Check refrigerant levels and recharge if necessary.
- Inspect electrical connections for damage or corrosion.
- Test the compressor for proper operation.
4. Defrost Issues
- Symptoms: Defrost cycle not initiating or completing.
- Causes: Faulty defrost timer, sensor issues, or wiring problems.
- Solutions:
- Check the defrost timer for proper operation.
- Inspect defrost sensors and wiring for damage.
5. Air Flow Issues
- Symptoms: Reduced air flow from the unit.
- Causes: Clogged air filters, blocked vents, or fan issues.
- Solutions:
- Clean or replace air filters.
- Ensure vents are clear of obstructions.
- Check fan operation and replace if necessary.
6. Electrical Issues
- Symptoms: Unit not powering on or intermittent operation.
- Causes: Power supply issues, faulty wiring, or control module problems.
- Solutions:
- Verify power supply is stable and adequate.
- Inspect wiring for damage or loose connections.
- Test the control module for proper function.
When to Call a Professional for Help
- Consult the Manual: Always refer to the user manual for specific troubleshooting guides related to your model.
- Safety First: Ensure safety when working with electrical components or refrigerants.
- Professional Help: If issues persist, contact a qualified Carrier service technician for assistance.
By following these steps, you can identify and potentially resolve common issues with your Carrier reefer unit.
Final Thoughts: Resetting Your Reefer the Right Way
Resetting a Carrier reefer unit is often all it takes to solve annoying alarms or cooling issues. Still stuck? We can help. Reach out to our reefer dispatch experts to get the support and loads you need.
There are two types of lights installed separately on the reefer trailer, a short distance from the unit. If the light is green, it means there is no issue, but other colors indicate a problem.